Monday, July 11, 2011

First harvest


The first tomatoes from our home garden.
Bonus: wedding ring makes a cameo!

Friday, July 8, 2011

Summer cookin'


Last night I made a frittata. 
Living in the California Central Valley definitely has its perks. 
Here, specifically fruit and vegetable perks. 


And eggs. Egg perks, too.


This frittata (with zucchini, onion, shallot, tomatoes, chard, and cheese) was accompanied by a mash made of potatoes and turnips, fresh corn, and for dessert--chocolate chip zucchini bread. 

(pre-broil)
My mom introduced me to making frittatas and I love them...you can put any leftover or fresh vegetables and meat in them, so they are a great way to clean out the fridge and make something healthy! Recipes follow....

Frittata
10-12 eggs (we get ours from our dog trainer, she has a bunch of chickens!)
various vegetables, maybe a little meat
I used:
~10 leaves chard (from farm garden)
1 zucchini (farm garden)
1/2 onion
1 shallot
tomato sliced on top (from Pedrick's our local produce stand)
Cheddar cheese (you can mix this into the eggs or put on top)
(Sometimes I had chopped chicken sausage or sliced up salami)

Crack eggs into a bowl and beat
Saute your vegetables (meat too if using) in an oven-proof pan (I use either a metal handled one or a cast iron one depending on my mood..)
Pour eggs over, add toppings if using (mine were the tomatoes and cheese)
Cook on the stove until the edges are set, then move under the broiler in the oven and broil for a few minutes until eggs are set. 


Potato-Turnip Mash
~ 2 dozen small turnips (mine were from the farm garden, none 
bigger than ~2 inches across, most ~1 inch across)
4 potatoes (I used reds)
Butter, milk, salt, pepper

Scrub turnips and potatoes, cut up into small pieces (kept mine pretty thin for quicker cooking, like 1/2 inch chunks)
Put into pot with water, bring to boil, then reduce heat and simmer for about 15 minutes or until the roots are soft
Drain, use potato masher to mash, add some milk, butter, salt and pepper to taste

I'll be posting later about the zucchini bread...I'm going to try as 
many different recipes as possible this summer! 

Thursday, July 7, 2011

Iva Bell Hot Springs


This past weekend we took a much needed (if short) vacation. This post should help you if you're thinking of doing a backpacking trip to Iva Bell Hot Springs, and it might be extra helpful if you are thinking of bringing dogs. Maybe it will also inspire you to take your own weekend vacation!

Carex in the granite on the way out.

We decided to start at the Devil's Postpile National Monument in Mammoth Lakes, CA. We hiked Fish Creek Trail (Starting at the Rainbow Falls trailhead) out to Iva Bell, which is 11.8 miles one way.
Potentilla!

We took off from work a little early on Friday, jumped in our van with the dogs, and headed to Mammoth Lakes. We slept in the van Friday night at a trailhead, and arrived at the Ranger Station before 8 am on Saturday to pick up our wilderness permit. We reserved a permit weeks beforehand online, so we just had to grab the permit and rent a bear can at the Station. Click here for more information about the Fish Creek trail and permits.

Hiking in.

Because the trail started in the National Monument, we had to take a shuttle to the trailhead (bought our shuttle tickets at the Mammoth Mountain resort--info here). Normally that would be simple, but with dogs, it's a little more involved and stressful! (Info on dogs in the Monument here.) We did survive. They allow dogs on all shuttles, but they have to wear muzzles. Our dogs (especially the German shepherd) aren't used to wearing muzzles, so that was a bonus fun factor (picture dog freaking out from being on full loud bus trying to madly scratch the muzzle off its face in very cramped quarters while you also hold a huge backpacking pack...).

There was a little runoff...(the trail is a stream)

Anyway, we made it to the trailhead in one piece (even the muzzles). The dogs wore their packs, and we had ours. The trail to the hot springs isn't particularly difficult, but it was hot and we wanted to do it all in one day. I'm not going to share exactly where the springs are--you have to find them like we did--but, this is a very handy resource: GPS track to springs. Sort of unfortunate that it's on the internet...but the number of people permitted on the trail per day is fairly low, plus the long hike makes it less likely the springs will be crowded. On the 4th of July weekend there were other folks out there but everyone was polite and quiet and twice we had a pool to ourselves!

Worth every step.

We hiked all 11.8 miles in one day (1 night camping at the springs), and made good time in and out (we'd approximate about 6 hours trailhead to springs). We are "pushers" though--we stopped for lunch and water but towards the end, when you really really want to stop, and your feet really hurt, and you just want to sit down...we kept hiking.


Dog bliss.

Wish you were here? Probably.

The springs are amazing--I have never before been to such a beautiful hot spring with deep and clear pools! Some are surrounded by meadows and some are in rocky areas (there are 4-5 pools total). The rocky pools are higher up and have amazing views of the John Muir Wilderness. Completely awe-inspiring! There are several nice campsites around the springs, we didn't get either of the best ones but ours was still good, a little farther from the pools but that kept it extra quiet.

Not a bad place to camp...

On the hike out we saw a bunch of wildlife! A deer, a black bear, and a rattlesnake. The bear was my first seen on the trail, and was actually a really good experience because I have an irrational fear of bears--the one we saw on this trip was totally scared and scampered off as soon as s/he saw us. Yay. The rattlesnake was also not dangerous as it had its mouth full with a bird! (Though rattlesnakes are a regular sighting at my place of work, so those aren't anything unusual to me.)

Siesta on the hike out.

On the way out we took it a little slower and stopped near a stream for a siesta in the shade. We rinsed off and ate and napped for a couple of hours, and refreshed hit the trail again. We got back to the Monument around 5:30 and walked by the Postpile (I hadn't been before) and took the shuttle out. We were lucky as the driver let us get on a bus going farther into the Monument (an empty bus!) so we could ride to the end and stay on for the ride back with our good seats (in the back, where our packs could go up behind our seats leaving room for the dogs on our laps/on the floor).

Camping Sunday night.


Once out, we got in the van and found a dispersed camp site to park at--it was amazing!! A large sagebrushy opening where we watched the sunset and made our dinner and explored. The next morning, we drove to Hot Creek, a geothermal area that used to be open to swimmers but is now closed. It's still a neat place to visit as the creek is in a beautiful canyon with a bunch of hot pools bubbling up around a very scenic cold water creek. We drove past the creek and found a spot off the road to park, and Adam set up the shower so we could wash off and make breakfast while the dogs explored. It was fantastic! Best morning I've had in a long time. Taking a shower in the warm morning sun of the high desert...not bad.

Hot Creek: apparently no hats allowed.

After our morning in the sagebrush we drove north on 395 to Virginia Lakes. We took the dogs on a short (probably less than 4 miles round trip) hike past three different high elevation lakes (above 9,000 feet), where we encountered more snow in that short hike than we had backpacking the previous two days.
Virginia Lakes: more snow, higher up.

After the hike, we piled into the car and headed home, north on 395 to Highway 88 back to the Valley. We saw some neat areas off of 88 that we hope to explore later this summer as we haven't been in that area yet. We stopped in a shady spot in some aspens for another afternoon siesta on our way home...we popped the top on the van and let the warm breeze through the car to sleep for about an hour (we tired ourselves out the previous couple of days)...again, heavenly! After all that, we still made it home by dinner time.

Castilleja.

Monday, July 4, 2011

Our Wedding: Outdoor, California, Picnic Style!

Update: since this was my first real post, I was still figuring out the system, so I apologize for the weird formatting you might see on this page! 
Also, I have two flickr albums of the wedding now:
Here for my favorite pictures or here for a bigger album. 
Thanks!


Our wedding was perfect: very relaxed, in the country, infused with family and friends, beautiful, and summery. Here I'll share with you all of the details of our (mostly) DIY wedding. Warning: there are a lot of details!


The end product...our wedding.
All photos from our wedding are courtesy of our great photographers, Caroline and Marc.
(Caroline is of the blog Coeur de la)
I started out looking at photos using Pinterest and The Knot, as well as researching various sites available. My friends sent me links to tons of blogs (including this one of a cute canning themed shower), and that's how I found my favorite blog, Young House Love. Their wedding was very similar to what I was picturing! Backyard BBQ style, all outdoors, relaxed, with a vibe like a big family reunion would have. Details on decor ideas later in the post!


My inspiration: John and Sherry's wedding from the Young House Love blog!
(Image from www.younghouselove.com)


Location
We wavered back and forth on where we wanted to get married. We knew there would be fewer than 60 guests, so we did not need a big venue. We saw the merits of doing something local--I've lived in the Central Valley for seven years now, so I felt that doing something out in farmland would be personal feeling since that's where I work. But, we wanted to keep it small so we considered doing an "on location" wedding up in the Sierras. That lead to massive searches of various venues and rental homes to be used for a small event...but everything was out of our price range or booked (we were engaged for less than four months, and we chose our wedding date based on our summer schedule of vacations, plus weather considerations). We really liked Sorensen's in the Sierras...but again, it was pricey and it would have been difficult to choose a date that worked with our schedules. 


Photos from a Fall wedding at Sorensen's--we love the aspens and high mountain ambiance of the resort!
Photo from www.dougmiranda.com.
In March, we decided on an old country home that was very close to my work here in the Valley. This home was just changing hands, and the new owners planned on making it into a bed and breakfast type of "country resort". They were very nice and had lots of big ideas, and were more affordable than some other places we had looked at (they asked $1750, other places we had looked at were $3500 and up for a day!). However, when we visited again in April, the house had still not changed hands and no work had been done on the yard. :( So, even though we had already sent out invitations (more on those later in this post) we decided to find a new place, again! 


I started asking around, and we ended up finding another privately owned home west of Woodland, CA. The owners are amazing people and had been thinking they might want to open their home for events or even start a B&B. It was perfect, and they charged us much less than the first location we had chosen, only $600 (full budget later in this post!). They even let us start setting up a week in advance, and clean up the next day. They did a TON of work on their house and yard including cleaning and repainting their pond, manicuring their yard, remulching, painting their outdoor furniture, working on lighting, installing new brick path edging, repainting the bathroom in their barn...they were amazing! By the time our wedding date rolled around, their yard was definitely Sunset-magazine-ready! We have nothing but positive things to say about this couple and their home and yard. So, steps 1 and 2: choose date and location: done. (PS We also considered: The Farm on Putah Creek where I used to work, as well as another local landowner's outdoor event space.)


Invites
As for our guest list, we ended up inviting just over 70 people. I have a very small family, so we invited my aunts, uncles, and cousins. Of course we also invited our parents and Adam's sister and brother-in-law, and a bunch of friends, some of whom were my side family friends, and many of whom were friends our age. We ended up with about 52 guests plus the homeowners and two of their friends, our photographers, and our bartender. I made our invitation, which we sent out over e-mail. I loved the email invitation idea, because it was free!! And, I found that people RSVP-ed very quickly (some the same day I sent the invite out). I used iPages to make my invitations, which ended up being a 2 page pdf attached to the email I sent. The first page had all of the relevant info (who, what, where, when) and a cute photo of us (in Tahoe last summer, see below), and the second page had more "bonus" info about hotels, directions, gifts, attire, etc. I emailed each guest individually with the invitation attached. Later, when we had to change locations, I sent another email with new directions in the body of the email, this was bulk mailed (bcc-ed) to everyone at once. 


Food & Drink
Next, we knew we wanted to do almost everything ourselves, but we did want to hire a caterer. We chose a local caterer, Buckhorn Catering, since I had been to a bunch of events around here that had used their services and loved the food. We wanted a picnic-y feel, so we had Buckhorn come out with and BBQ their signature tri-tip and chicken on-site. 


Our full menu was:
Appetizers:
Veggies with dip
Fruit platter
Chips and Salsa
Pita chips and hummus

Dinner:
Tri-tip
Chicken with salsa topping
Fresh salad with dressing on the side
Broccoli salad
Roasted potatoes
Seasonal roasted vegetables
Rolls with butter


Sounds and looks pretty good, right? One thing I would change would be have something warm for appetizers (instead of cold snacks). For dessert, I had decided early on that I did not want cake...I wanted my favorite food, cookies! So, I asked five friends to each make one to three kinds of cookies for my wedding. These would be placed in large glass jars of various sizes and displayed as a cookie buffet after dinner. It turned out great! We ended up with these kinds of cookies (I made two kinds also):

Chocolate Chocolate Chip-Jo Ann
Lemon Palmiers-Jo Ann
Meringue Kisses-Judy
Peanut Butter Chocolate Chip Oatmeal-Liz
Berry Thumbprints-Liz's mom Risë
Vanilla Sugar-Emily
Gingersnaps-Emily
Toffee Chip-Jo Ann
Chocolate Krinkles-Anne
Coconut Macadamia-Liz


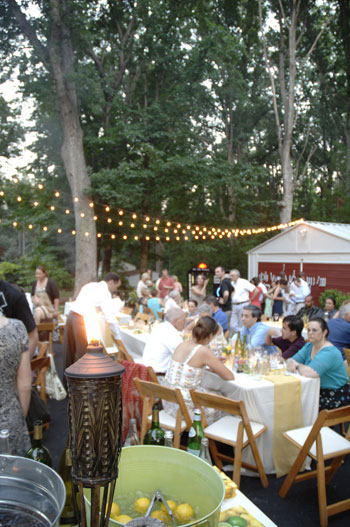
Since our event was at a private home, we did not need an insured bartender (actually the entire event was covered by a one-day increase in coverage on my parents' homeowners insurance), which lowered our cost quite a bit. A friend of a friend had offered to help out in any way he could (and he was moving into the tank house about a mile from where our wedding was to be held), so we asked if he'd be our bartender. He was great, and we fed him dinner and paid him $60 for a few hours of bartending. The bar consisted of two tables, with beers in party buckets full of ice on the ground (self-serve), pitchers of lemonade and iced tea, two dispensers of alcoholic drinks, and our bartender pouring wine (white wines displayed in a fancy ice bucket on the table and reds next to them not on ice). 


For the alcohol, we went to a local wine/beer/liquor superstore and filled our cart with about 15 kinds of bottled beer six packs. We also had decided to do two mixed drinks in dispensers: a margarita and a cranberry-orange punch. For the margarita we bought 1.5 liters of tequila blanco, and for the cranberry orange punch we got spiced rum, peach schnapps, and vodka. We got the cranberry and orange juices at the grocery store, and for the margaritas, we bought a great mixer from Cost Plus. Here are the ratios:


Margarita:
2 parts mixer
1 part tequila
Add sliced limes

Punch:
1 part each: cranberry juice, orange juice, vodka, 
peach schnapps, and spiced rum.
Add frozen cranberries and sliced oranges

Warning: these are both strong. We definitely could have reduced the alcohol in both! (This may have prevented folks from ending up in the pond later in the evening...but the wading was fun and everyone had a designated driver...!)


We bought the dispensers at Cost Plus: Mason Jar Water Tank. They were only $14.99 each, but we found out that you get what you pay for! Of the first two I brought home, one had a hole in it! The glass was so thin that there was just a hole...that was kind of a mess when I was washing it out. Water everywhere! We exchanged it for a non-holey one. Then, on the day of our wedding, another one just split completely in half when we were filling it with drink and ice! Luckily the caterer came to the rescue with another dispenser they had brought. Anyway, word of warning: cheap can mean flimsy. 

For the wine, my parents are wine people, so I left it up to my dad to choose whatever he wanted to serve. 


Supplies and Layout


The caterer provided water in pitchers, water glasses, appetizer plates, dinner plates, silverware, and dessert plates. We rented wine glasses and 13 oz glasses (for alcoholic and nonalcoholic drinks), as well as white tablecloths, napkins, and chairs. We borrowed eight tables from my work (36" x 72" banquet tables), two tables of the same size from the location homeowners, and two more smaller tables (36" x 48") for gifts and favors (also from my work). We also used the location owners' outdoor furniture (two round tables with umbrellas and eight matching chairs). We borrowed three more umbrellas and a bunch of white plastic outdoor chairs to put out on the lawn where the games were (more on that later). 


OK, now for the decor and layout of our event! The home has a big beautiful lawn in the front, and in the back, a brick patio, wooden deck and some low landscaping (and a waterfall!). In the front, we put out some signs directing folks to the back (signs made by my dad!), and umbrellas and chairs. We also put out lawn bocce and a bean bag game (made by Adam; in the midwest this game is known as corn hole..). 


In the back, the caterers set up their buffet on the deck, with the bartender on one far end. eight tables were set up on the rounded patio, and the two metal tables were put out in the low landscaped areas. The favors table was on the far end of the deck from the bartender, and the gifts table was just off the walkway on the way in.


Tables and Lighting

For decorating, we choose a "country" or "picnic" theme to go with our countryside location. We used the rented white tablecloths and napkins, and my mom made runners out of fabric I picked out. I chose a large colorful print for one and a smaller mini-print for the other. The fabrics were not expensive (cotton from the quilting section at Jo Ann Fabrics) and my mom didn't even have to sew anything, she just "hemmed" the edges by ironing them over (worked great). The fabrics can be used for future sewing projects (future post!). 


I used mason jars for the favors (more on those later in this post), candle holders, and vases. Depending on the size, these vary from about $0.70 each to just over a dollar each. Because of a breeze, we used many 8 ounce jars for candles, plus some votives (I bought a 72 pack of glass votive holders and white candles on Amazon for about $40). I also had purchased two dozen citronella votives (on Amazon), which went into many of the 8 ounce jars. In the end, only some of the 8 ounce jar candles stayed lit due to the breeze. Oh well! I had also purchased extra 4 ounce jars for candles but we ended up not using many of those since candles would not stay lit in them (I'll use all of the leftovers for canning this summer). We also had three "Off Powerpad Lamps" (bought them here for $10.29 each). We ended up not needing those either, since the breeze kept the bugs away!


For other lighting, we purchased a 100' strand of market lights at PartyLights.com. We got the green wiring and the "G30" clear lights. This cost about $120, but later in the evening when it had gotten darker, the ambiance was great (looked good even when it was light out). It really made the yard feel festive. We bought metal stakes and cedar 8-foot 2x2's to string the lights. First Mr. Active put the metal stakes in the ground using a hammer or post-pounder, then used wire to attach the cedar poles to the metal stakes (so you only saw the nice cedar). He had pre-screwed one screw into the top of each pole to hook the light string around. The lights started near the bartender and went around the semi circular patio and down the side of the house. This way they sort of lead the way for arriving guests. 


Flowers
For flowers, I had originally had big ideas about all the different kinds I wanted (I loved this one), but then I found out how expensive florists are, and even how expensive buying wholesale flowers can be! So, I ended up using Fifty Flowers and I chose red Alstromeria (100 stems) and "mini" sunflowers (100 stems). The "mini" sunflowers weren't actually as mini as I had pictured (just small) but they worked great anyway. 


The Alstromeria were grown in Ecuador and the sunflowers were from California--I felt weird about ordering foreign flowers so when I got the local sunflowers ("CA Grown") I was happy to see that. We used pint canning jars for vases, and had wrapped light green ribbon around each one (we used a glue gun and just made a band of ribbon around the top of the jar, gluing it on). Each vase just got 2 stems of each type of flower. My wonderful mother-in-law, Mr. Active's aunt, my mom, and our friend spent maybe an hour doing all of the flower arranging for us! We had a bunch of flowers leftover so we had brought out a bunch of miscellaneous cheap glass vases which were all filled with flowers and scattered around. 

Favors


For the favors, I made Spoon Butter, from a great blog called Food in Jars. It's a mixture of mineral oil and beeswax, and you use it to condition your wooden kitchen tools (spoons, cutting boards, salad bowls, etc). It's ideal if you first rub your tools with plain mineral oil, then finish with the spoon butter as a sealant. It's great! And it also makes a nice hand moisturizer (smells like beeswax/honey). I thought about the use of mineral oil (petroleum product), but various websites note that other oils (nut, seed, olive) spoil (mineral oil does not)--so you could potentially have a problem if the oil on your cutting board goes rancid. I have no idea if this actually does happen or how fast, but I thought it would be best not to experiment on my wedding guests. So, I used mineral oil (from the grocery store in the health section--it's also a laxative!). 


I put the spoon butter into 4 ounce canning jars and I used Avery ivory business cards to make instructional labels. We folded the cards in half, punched a hole in each one, and tied them onto each jar around the lid using raffia. They turned out great. I made enough for one jar per couple, and we ended up with about a dozen extras. Thank goodness Mr. Active's mom took the extras home with her so I don't have a lifetime's worth of spoon butter!

Finishing Touches
I went to a friend's wedding in 2009 that was completely DIY (Her entire family did a ton of work! Second most amazing wedding I've been to...after my own). She had a neat photo display...so I copied it. I just went through photos of our adventures and chose a bunch (ordered 4x6's from Shutterfly), bought some twine and gathered up all of our clothespins. I hung 4 lines of twine (using push pins) on two sides of the house (near the walkway and near the buffet) and our friends hung the photos up using two clothespins per photo. This was a nice activity for our guests to look at during the party. We liked it too, all of the pictures reminded us of how much fun we have! I'm going to frame those up to display in our house post-nuptials (post on that to come!). 


I wanted to involve California native grasses if I could (that's an interest of mine), so a couple of days before the wedding I gathered a 5 gallon bucket full of five kinds of native grass seed heads. I used these to make big bouquets, which we tied onto the cedar party light poles and the deck and fence posts using raffia. I think this added a really nice finishing touch. 


We needed some signs directing folks to the location as well as small signs on-site (for bathrooms, etc.). My dad made the directional signs out of wood and painted them with our names, arrows, and decorative flowers. He's so creative! We are going to re-use them in and outside our house (eventually). I also made some small paper signs by printing the lettering on white cardstock and gluing those onto bright yellow paper so each had a colored border. These paper signs were for the bathrooms (one in the house and one in the barn!), the kinds of drinks we had, the favors, and cookies table. 


Attire
I knew from the start that I did not want a wedding dress--not my style, and I just can't justify spending that much money on a dress that I'll only wear one day. So, I searched the internet for "casual wedding dress", "beach wedding dress", and looked at lots of bridesmaids dresses. My mom and I also scoured a couple of malls...no luck. Then I took another look at J. Crew's bridal collection, and had some luck! I ordered their Sophia dress in Spiced Wine (this was when they made that dress in silk chiffon, they don't sell my dress anymore). It fit perfectly!! And it was only $190--cheap for a wedding dress that I really will wear again! I also picked out some new sandals on Zappos--$39. Deal. Done. 


For Mr. Active, we had a little more difficult time finding his outfit. After a couple trips to the mall, we ended up with a vest (clearance! $19 at Macy's), Banana Republic pants, Calvin Klein white shirt, hat (sale! $17 at JC Penney), and got shoes at Zappos. He looked fantastic, and we really lucked out finding pants that fit (the man is long and lean) that matched our on-sale vest. And--it can all be worn again. We lucked out with the weather, too--we were both comfortable. 


The Photos
One of the blogs I follow is Coeur de La, which happens to be written by someone who grew up on the same street I did. I liked the photography I saw on her blog, so went out on a limb and asked if she'd ever thought about doing wedding photography (even just one time!). She was very interested, and we ended up having both her and her husband shoot our wedding--for a price that fit well within our budget. They were fantastic--we wanted very few posed photos, mostly just candids, and we wanted them to be very out of the way, and we got exactly what we had hoped for. The few posed pictures we did do were fun and didn't take very long. We got exactly what we wanted and I highly recommend her! She is interested in getting into more wedding photography. Check out her blog for more info!


The Day
The party was so much fun! Everyone arrived around 5pm and dug into drinks and appetizers. At 5:30, we gathered everyone up on the back patio, and had our short and sweet ceremony standing on the stairs up to the deck. Our officiant was our good friend, and he did a great job personalizing it. After that, we continued socializing through dinner and dessert, and at sunset (which is pretty late nearing summer solstice) we headed out onto the front lawn to play bean bag. The weather was so warm (and the drinks apparently a little too strong?) that some folks even ventured into the pond! Our photographers snapped some final pictures of everyone during the amazing sunset. We wrapped up the evening with the final guests sitting in the back nibbling on cookies and chatting. 


(PS Full wedding budget to come for those who are interested..)